
- I hesitated between updating the previous post directly or posting a new post. I finally decided to make it a new post so that it’s not too long to read. I will only develop on new stuff here.
I have updated the UI.MultipleInputForm so it could handle more input types:
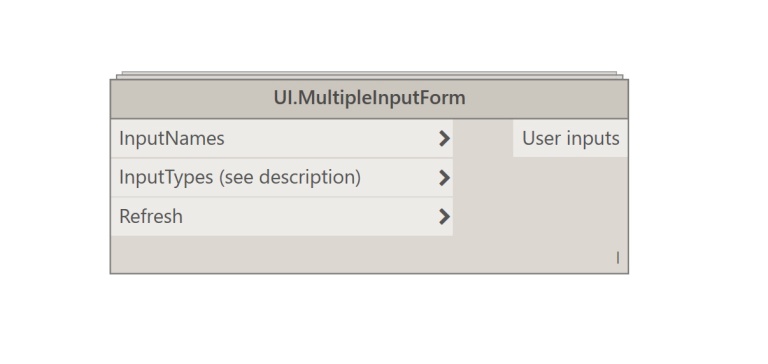
Here is the Input type codification:
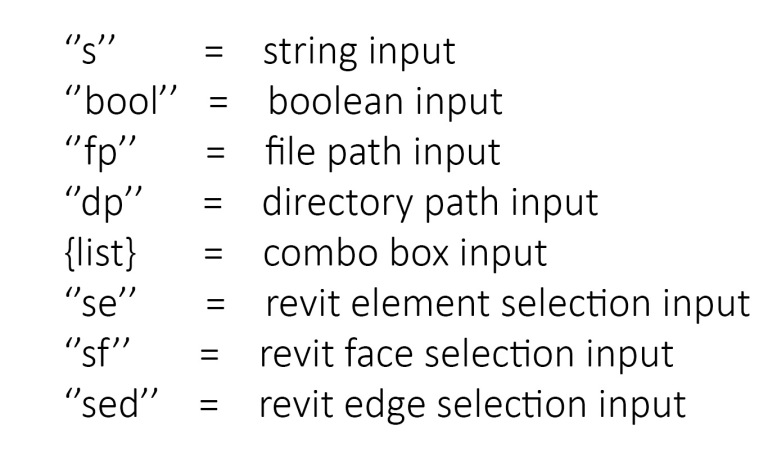
1. Revit Selection Inputs:
The Revit element, face, and edge selection inputs are pretty straight forward. These type of inputs generate a button that allows interaction with the Revit model. The selections are then output as lists. Here is an example with the “se” (select Revit element) input type:

2. ComboBox Inputs:
String and Number lists:
The combo box is the only input that needs special treatment, because there is no codification. In order to create a drop-down list input in the form, you just need to feed your drop down list items as a one level nested list within the InputTypes list. The list structure is very important here. The List.Create Node is perfect for creating the right input:

You can- of course- add as many drop down lists as you want:

Revit Element lists:
In case you use Revit elements as items for your drop down list, the node will display the name of the elements, and return the Revit element as an output:

3. Form features:
I have also added a couple of features to the form. I followed Brendan Cassidy’s example and deleted the maximise/minimise and resize options. I also set the form so that it would always be in the forefront, this way it will never be hidden which could prevent Dynamo and Revit from working.
This node should make it a little easier for those allergic to Dynamo to benefit from its power!
Here’s the code to the node:
This file contains bidirectional Unicode text that may be interpreted or compiled differently than what appears below. To review, open the file in an editor that reveals hidden Unicode characters.
Learn more about bidirectional Unicode characters
| #Copyright (c) mostafa el ayoubi , 2016 | |
| #Data-Shapes http://www.data-shapes.net , elayoubi.mostafa@gmail.com | |
| import clr | |
| clr.AddReference('System.Windows.Forms') | |
| clr.AddReference('System.Drawing') | |
| from System.Drawing import Point | |
| from System.Windows.Forms import Application, Button, Form, Label, TextBox, CheckBox, FolderBrowserDialog, OpenFileDialog, DialogResult, ComboBox, FormBorderStyle | |
| from System.Collections.Generic import * | |
| clr.AddReference('RevitAPIUI') | |
| from Autodesk.Revit.UI import Selection | |
| clr.AddReference('RevitNodes') | |
| import Revit | |
| clr.ImportExtensions(Revit.Elements) | |
| clr.ImportExtensions(Revit.GeometryConversion) | |
| clr.AddReference('RevitServices') | |
| from RevitServices.Persistence import DocumentManager | |
| doc = DocumentManager.Instance.CurrentDBDocument | |
| uidoc = DocumentManager.Instance.CurrentUIApplication.ActiveUIDocument | |
| class MultiTextBoxForm(Form): | |
| def __init__(self): | |
| self.Text = 'Data-Shapes | Multi Input UI' | |
| self.output = [] | |
| self.values = [] | |
| def setclose(self, sender, event): | |
| cbindexread = 0 | |
| for f in self.output: | |
| if f.GetType() == TextBox: | |
| self.values.append(f.Text) | |
| if f.GetType() == CheckBox: | |
| self.values.append(f.Checked) | |
| if f.GetType() == Button: | |
| if f.Tag == None : | |
| self.values.append(f.Text) | |
| else: | |
| self.values.append(f.Tag) | |
| if f.GetType() == ComboBox: | |
| self.values.append(globals() ['dict%d'%(cbindexread)][f.Text]) | |
| cbindexread += 1 | |
| self.Close() | |
| def reset(self, sender, event): | |
| pass | |
| def openfile(self, sender, event): | |
| ofd = OpenFileDialog() | |
| dr = ofd.ShowDialog() | |
| if dr == DialogResult.OK: | |
| sender.Text = ofd.FileName | |
| def opendirectory(self, sender, event): | |
| fbd = FolderBrowserDialog() | |
| dr = fbd.ShowDialog() | |
| if dr == DialogResult.OK: | |
| sender.Text = fbd.SelectedPath | |
| def pickobjects(self, sender, event): | |
| sel = uidoc.Selection.PickObjects(Selection.ObjectType.Element,'') | |
| selelem = [doc.GetElement(s.ElementId) for s in sel] | |
| sender.Tag = (selelem) | |
| def pickfaces(self, sender, event): | |
| selface = uidoc.Selection.PickObjects(Selection.ObjectType.Face,'') | |
| faces = [uidoc.Document.GetElement(s).GetGeometryObjectFromReference(s).ToProtoType(True) for s in selface] | |
| sender.Tag = [i for f in faces for i in f] | |
| def pickedges(self, sender, event): | |
| seledge = uidoc.Selection.PickObjects(Selection.ObjectType.Edge,'') | |
| edges = [uidoc.Document.GetElement(s).GetGeometryObjectFromReference(s).AsCurve().ToProtoType(True) for s in seledge] | |
| sender.Tag = edges | |
| def topmost(self): | |
| self.TopMost = True | |
| form = MultiTextBoxForm() | |
| form.topmost() | |
| xlabel = 25 | |
| xinput = 125 | |
| y = 10 | |
| fields = [] | |
| error = 0 | |
| cbindex = 0 | |
| #Input form | |
| if isinstance(IN[0],list): | |
| inputnames = IN[0] | |
| else: | |
| inputnames = [IN[0]] | |
| if isinstance(IN[1],list): | |
| inputtypes = IN[1] | |
| else: | |
| inputtypes = [IN[1]] | |
| for i,j in zip(inputnames,inputtypes): | |
| label = Label() | |
| label.Location = Point(xlabel,y+4) | |
| label.Height = 20 | |
| label.Width = 80 | |
| label.Text = str(i) | |
| form.Controls.Add(label) | |
| if isinstance(j,list): | |
| cb = ComboBox() | |
| cb.Location = Point(xinput,y) | |
| cb.Width = 150 | |
| globals()['dict%d'%(cbindex)] = {} | |
| try : | |
| for k in j: | |
| globals()['dict%d'%(cbindex)][k.Name] = k | |
| cb.Items.Add(k.Name) | |
| except : | |
| for k in j: | |
| try: | |
| globals()['dict%d'%(cbindex)][str(k)] = k | |
| except: | |
| globals()['dict%d'%(cbindex)][k.encode('utf-8').decode('utf-8')] = k | |
| cb.Items.Add(k) | |
| form.Controls.Add(cb) | |
| form.output.append(cb) | |
| cbindex += 1 | |
| elif j == 's': | |
| tb = TextBox() | |
| tb.Text = 'Default' | |
| tb.Width = 150 | |
| tb.Location = Point(xinput,y) | |
| form.Controls.Add(tb) | |
| form.Controls.Add(label) | |
| form.output.append(tb) | |
| elif j == 'bool': | |
| yn = CheckBox() | |
| yn.Location = Point(xinput,y) | |
| yn.Text = 'Yes/No' | |
| form.Controls.Add(yn) | |
| form.output.append(yn) | |
| elif j == 'fp': | |
| fp = Button() | |
| fp.Width = 150 | |
| fp.Text = 'FilePath' | |
| fp.Location = Point(xinput,y) | |
| form.Controls.Add(fp) | |
| fp.Click += form.openfile | |
| form.output.append(fp) | |
| elif j == 'dp': | |
| dp = Button() | |
| dp.Width = 150 | |
| dp.Text = 'DirectoryPath' | |
| dp.Location = Point(xinput,y) | |
| form.Controls.Add(dp) | |
| dp.Click += form.opendirectory | |
| form.output.append(dp) | |
| elif j == 'se': | |
| se = Button() | |
| se.Width = 150 | |
| se.Text = 'Select model element(s)' | |
| se.Location = Point(xinput,y) | |
| form.Controls.Add(se) | |
| se.Click += form.pickobjects | |
| form.output.append(se) | |
| elif j == 'sf': | |
| sf = Button() | |
| sf.Width = 150 | |
| sf.Text = 'Select face(s)' | |
| sf.Location = Point(xinput,y) | |
| form.Controls.Add(sf) | |
| sf.Click += form.pickfaces | |
| form.output.append(sf) | |
| elif j == 'sed': | |
| sed = Button() | |
| sed.Width = 150 | |
| sed.Text = 'Select Edge(s)' | |
| sed.Location = Point(xinput,y) | |
| form.Controls.Add(sed) | |
| sed.Click += form.pickedges | |
| form.output.append(sed) | |
| else : | |
| error = 'One or more input types are invalid, visit http://www.data-shapes.net for more informations' | |
| y+= 30 | |
| button = Button() | |
| button.Text = 'Set values' | |
| button.Width = 150 | |
| button.Location = Point (100,y+30) | |
| button.Click += form.setclose | |
| form.Controls.Add(button) | |
| form.MaximizeBox = False | |
| form.MinimizeBox = False | |
| form.FormBorderStyle = FormBorderStyle.FixedSingle | |
| form.Height = y + 120 | |
| if error == 0 and IN[2] == True: | |
| Application.Run(form) | |
| result = form.values | |
| OUT = result,True | |
| elif IN[2] == False: | |
| result = "Set toggle to true!" | |
| OUT = result,False |

This is a great resource!
I noticed a couple of things:
– The latest version (13-11-2016) doesn’t allow multi inputs. the older versions do.
– The dropdown list doesn’t seem to work at the moment either.
This is the only source for a UI i’ve come across on the web, very useful
LikeLike
Hi Marlo, Thank you for the feedback. I just ran a test and it turns out the issue comes from the way the python node is wrapped in the custom node. Thanks for pointing this one out!
Please update the package to the vesrion 2016.11.15 ans let me know if it’s working fine for you.
LikeLike
I’ve tried it, and it works as a charm now.
Also i’ve been looking at the code and i noticed it’s not possible to fill in a default value. Will this be possible in the future?
Recently i’ve been working on several Revit Add-Ins, and if you’d like i can test your new versions and maybe also add some idea’s to add new functionality.
Cheers
LikeLiked by 1 person
allowing a default input value would indeed be a good idea. I was trying to keep the inputs to the minimum, in order to keep is as simple as possible. I have been thinking about making another node with more inputs, like default values and styling options. I will definitely keep you posted when it’s ready !
LikeLike
Amazing. That’s simply amazing. Thanks for this handy tool. I will give it a try.
LikeLiked by 1 person
hi Grea node. i have update dynamo to 1.2.1
UnicodeDecodeError: (‘unknown’, u’\xb0′, 0, 1, ”)
LikeLike
Hi Brid,
I’m glad you find it useful. Is that an error you get whith version 1.2.1 ?
I just tried all input types with that version and it seems to work.
Could you please post more information about the issue you meet on the github repository :
https://github.com/MostafaElAyoubi/Data-shapes/issues .
Thanks!
LikeLike
Terrifically useful node – thanks so much for creating and sharing! If I had the ability I would love to modify to allow multiple selection listboxes for input Alas my coding skills are currently limited to the now archaic Pascal and FORTRAN.
LikeLiked by 1 person
Thanks for the feedback Scott! I’ll try and have that in the next release of the package along with some other new features. Stay tuned!
LikeLike
Checkout this article : https://data-shapes.net/2016/12/11/batch-add-shared-parameters-from-txt-file-with-ui-multipleinputform/ !
LikeLike
Hi want to use this.But I am facing
warning:
IronPythonEvaluator.EvaluateIronPythonScript
operation failed.
Traceback(most recent call last):
File””,line 101,in
IndexError:index out of range: 1
LikeLike
Hi Bikashseas ,
Could you please post a screenshot of your inputs in the github repository ( https://github.com/MostafaElAyoubi/Data-shapes/issues ) or dynamo forum so I can look into it ?
LikeLiked by 1 person
Hi solved that problem,but now I am facing another.Droop down menu is not working.
I posted it in Dynamo forum.Please see it.
LikeLike
Hi ,
I tried to create multi UI , like this : https://drive.google.com/file/d/0B9fh1NlhI20wNUpXeldwNEtxWTg/view
Sometimes it doesn’t follow that order.
LikeLike
Interesting use 🙂

I added an output to the node in order to allow that :
You must update the package to 2016.12.08
LikeLike
Awesome! Sincerely thanks 🙂
LikeLiked by 1 person
Hi,
Mutilple elements selection sometimes made revit stop working. Could you add an element selection ? I appreciate it 🙂
By the way, this is my script that was built form your UI and Archi-lab. I’ve been trying to create and add filter by dynamo with UI input. I’m still perfecting it.
https://drive.google.com/file/d/0B5JiAYYvbI8eUUw5TXE0dHV3N00/view?usp=sharing
LikeLiked by 1 person
Hi Duy Vu ,

I tried your script on Revit 2017 and Dynamo 1.2.1 and it all seems to work fine. Don’t forget to press finish when you’re done selecting the elements :
What do you mean by “could you add an element selection” ?
LikeLike
Yep, it is working fine. In my case, I just want to select an element, pressing finish is a waste of time, and when I forget press finish, it make revit stop working.
Sorry my english is not good. I mean this “an element selection” :
https://drive.google.com/file/d/0B5JiAYYvbI8eelFwVkRFLXNibTA/view?usp=sharing
LikeLiked by 1 person
It would be nice to be able to start excel, do some computations and bring the calculated value or values back as inputs or somethink like that.
I like your work, thanks.
Marcel
LikeLiked by 1 person
Hi there,
First off; what a fantastic script! With that set: Is there any way to change the width of both the window/UI menu and the input names? I managed to figure out how to adjust the height (“y”), but can’t seem to find the “x” anywhere.
With kind regards
LikeLiked by 1 person
Hi Mathias,
thanks for your message! If you want to modify the width of the label width you need to change the value on line 110 “label.Width = 80” .
For the form itself, you’ll need to add a line of code after the initiation of the form (line 85) that would look like this : form.Width = [your value].
Have a good day!
LikeLike
That works perfecty! Do you know a site or search I could make in order to find more UI-customizable “settings”? Just for the visual part of the menu.
Alot of thanks for the quick response!
LikeLike
There are plenty of resources online for winforms. Most of them are in C# but it’s not too complicated to deduce how to do it in python. You should also check out UI.MultipleInputForm ++ : https://data-shapes.net/2016/12/13/ui-multipleinputform/
LikeLike
Hi !
I have had run the script correctly . But the problem is that the parameter that I loaded doesnt appear in the selected Category . I tried to loaded manually but appears the revit window : The selected parameter has already been added.
Then I have look into Project Parameters and click modify . I have notice that the parameter is loaded with the right group parameter but not with the Category which I selected to be loaded . The selected category doesnt appear in the Category list .
Have a good day!
Alejandro
LikeLike
Hi Alejandro,
Thanks for your comment sorry for the very late reply.
You’re referring to the “batch add shared paramters script” right?
What version of Revit/Dynamo are you using and what category/group are you trying to add the parameters to ?
LikeLike
Hi Data Shapes. Good day. First I want to say great stuff you got here. Secondly, I was hoping you could add a feature wherein I can select a face from a link, or it there any existing already, can you assist me help get through this? Thank you very much.
LikeLike